Choosing A Telescope
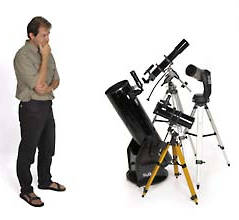
Are you looking for a new telescope? If so, you probably wonder what kind of options you really need. It might be tempting to get the most expensive one that could rival the telescopes that professional astronomers use. However, if you don’t plan on competing with Neil DeGrasse Tyson, you should consider a telescope that will match your skywatching habits.
Things To Consider When Choosing Your Telescope
- Aperture: This should be your number-one consideration. Aperture is the diameter of the main optical component on the telescope. All other considerations being equal, the wider the aperture, the better. Every time the aperture doubles, your telescope will be able to gather four times more light. That means a telescope with a 6” aperture will be able to see objects that are 1.5 magnitudes too dim for a 3” telescope. Wider apertures also means that your choice will be able to support greater magnifications while maintaining the same viewing field.
- Portability: How often do you add a telescope to your luggage when you travel? At this point, you’re probably tempted to buy the one with the largest aperture you can afford, but it won’t do you much good if lugging it around, setting it up and tearing it down is a nightmare. If you’re a total astronomy lover who has a subconscious desire to discover a new comet and you show off your astrophotography images the way some people show off pictures of their children, you might not mind so much. However, if you’re a backyard astronomy hobbyist, you probably just want one that’s easy to get out of the garage on the especially clear nights.
- Should You Consider Magnification? Actually, magnification should be rather far down on your priority list. Remember that you magnify objects in the night sky, you’re basically magnifying the image you see in the telescope. Enlarge it too much, and the image could both be hopelessly fuzzy and too narrow to make out much in the way of detail anyway. It does come back to the aperture again. Assuming that your telescope is one of the best and you get mostly clear nights with excellent viewing conditions, your magnification should never be more than fifty times your aperture in inches, or double the aperture in millimeters. That basically means you should ignore those absolute beginners’ telescopes you see in the toy shop with the magnification plastered all over them. That’s not going to be useful when the aperture is so tiny.A useful trick is to calculate the magnification you can get with any eyepiece. Find the focal length of the scope. This isn’t necessarily the length of the tube. Instead, it’s the distance from the primary lens or mirror to the image it forms. You divide the focal length of the scope by the focal length of the eyepiece to get the magnification. Which means a scope focal length of 750, divided by an eyepiece focal length of 10, will give you a magnification of 75x.
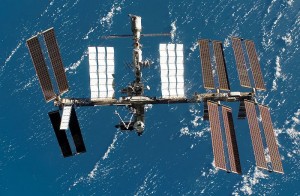
- Don’t worry if images sometimes appear fuzzy. It might not be the telescope. Even when the night seems clear with no clouds, the visibility through the atmosphere changes quickly. That’s the reason images of the night sky taken from the International Space Station display many more stars than are visible from Earth’s surface and the reason some nights are better for viewing than others.
Types Of Telescopes
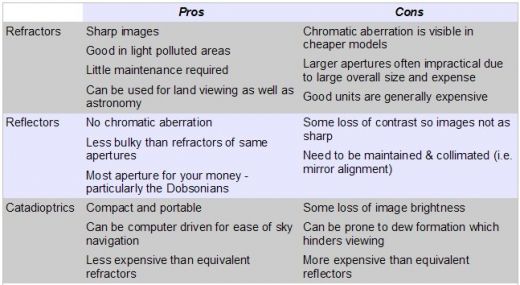
Do you have a favorite category of objects to view? If so, you should consider one of the three most common types of telescopes.
- Refractors: These are a favorite among lunar and planetary observers who want a sharp image of nearby objects at high magnifications. They have the stereotypical long tube, with a large front (objective) lens and small eyepiece in the back. Refractors also tend to be low-maintenance and rugged, making them a better choice for people who don’t want to miss out on an interesting event because they’re messing with optics. On the flip side, these telescopes tend to be the more expensive type.
- Reflectors: This type uses a concave mirror in the bottom of the scope to reflect and focus the light. The Newtonian reflector hasn’t changed much from the type of telescope invented by Isaac Newton. This type reflects the light to a secondary mirror that sends the image to an eyepiece near the front. The Dobsonian reflector is basically the same kind of scope on a mount that makes it easier to use. Both types are typically slightly higher maintenance and need the occasional optical collimation, but is less expensive than refractors.
- Catadioptic or compound telescopes combine the elements of refractors and reflectors in a more compact package. People who want a highly portable scope that they can travel with like this type for its portability and resistance to dust. It isn’t quite so resistant to dew, however, so a protective collar for the exposed corrector plate is recommended. It has about the same maintenance needs as a Newtonian reflector.
Accessories
This is always something to consider when buying a telescope or any high-priced item. What “options” are you really going to use? Some items to consider include:
- The Mount: This should be sturdy enough to actually hold up your telescope and keep it from wobbling when bumped. It shouldn’t shake more than a second or two when tapped, and you will most definitely be able to tell while you’re trying to focus on Jupiter when you just bumped the mount when your knee. Basic types of mount are altitude-azimuth and equatorial mounts.
- Altitude-Azimuth Mounts can rotate the telescope along the Z-axis (altitude or up and down and along the X-axis (equatorial or left to right). Where’s the Y-axis? Well, if you can rotate the telescope that way, you might want to check the mount for a crack somewhere. Dobsonian telescopes usually use this type of mount. Birdwatchers who use telescopes like altitude-azimuth mounts for being able to track flying birds.
- Equatorial Mounts are suitable for tracking objects as Earth rotates and sometimes include a drive motor to turn the telescope automatically. It only rotates along one axis at a time. Astrophotographers and astronomy enthusiasts who like to watch critical events in the night sky prefer this type of mount.
- Computerized scopes: Computers on telescopes are most often seen with the “go-to” versions that can automatically find objects in the night sky. They aren’t necessarily easier to use than the non-computerized versions. Unless you can find an affordable computerized scope that has GPS, you’ll still have to have a good knowledge of the night sky and program in location, time and date every time you use it. Then you have to choose two bright stars that you know by name, point it north if you’re in the northern hemisphere or south if you’re in the southern hemisphere, and let it align itself. If you still think the effort and expense is worth it, do not skimp on an “economy” model or you will regret it.
- Finders: Finding objects in the night sky is like target practice. If you can’t hit, or see, what you’re aiming at, you’re probably going to get laughed at by the fellow members of your local astronomy club. That means buying a good finder if one didn’t already come with your telescope. Essentially, it helps your scope stay pointed at your target. It should have an aperture of at least an inch as well as look and feel solidly constructed. Another popular option is the reflex sight, which works like a laser rangefinder to keep your telescope pointed at your target.
- Astrophotography: I recommend getting used to using a telescope before you even think about this. A lot of beginners have been disappointed by lame images simply because they bought the wrong equipment or didn’t quite know how to use it. Of course, this shouldn’t discourage you if you’re an experienced skywatcher with a sturdy mount and a lot of patience. Like most options, the really good astrophotography equipment isn’t cheap, but you can still dazzle your friends with those cool images you got once you get up and running with it.
Where Can I Find All This?
If you’ve browsed astronomy sites, you’ve probably seen the ads for telescopes. I’m partial to Orion, myself. They have a wide range of options for skywatchers of all levels of skill and enthusiasm.
…Or, Try eBay.
Maybe somebody decided that they don’t use their telescope as much as they thought they would. In a lot of cases, it’s not the fault of the telescope. You might find a used, but still good, telescope if you look around for listings like these.
[ebayfeedsforwordpress feed=”http://rest.ebay.com/epn/v1/find/item.rss?keyword=astronomy+telescope&sortOrder=BestMatch&programid=1&campaignid=5337337555&toolid=10039&customid=telescopes&minPrice=500&listingType1=All&lgeo=1&feedType=rss” items=”10″]