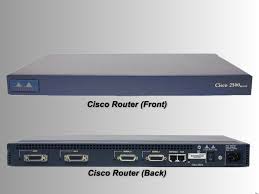
Cisco Router Basic Configuration
Routers are pretty much a mystery for a lot of people. If you asked someone in your accounting department to point to the one in their office, they might scratch their heads and admit that they don’t even know what it looks like. However, since you are a network-savvy person, you already know that you can connect to it and adjust its settings to your liking. (There are lots of opportunities for mischief here, but since you are an honest network administrator, you’d rather not get into that.) If you’ve been around for a while, it’s likely that you’ve forgotten a step or two while configuring your router at some point and had to go back to it, so it helps to have a checklist of commands that you probably have annotated with your routers’ current settings. If you don’t have one, you might end up wishing you did someday.
The Cisco Router IOS
Getting Started
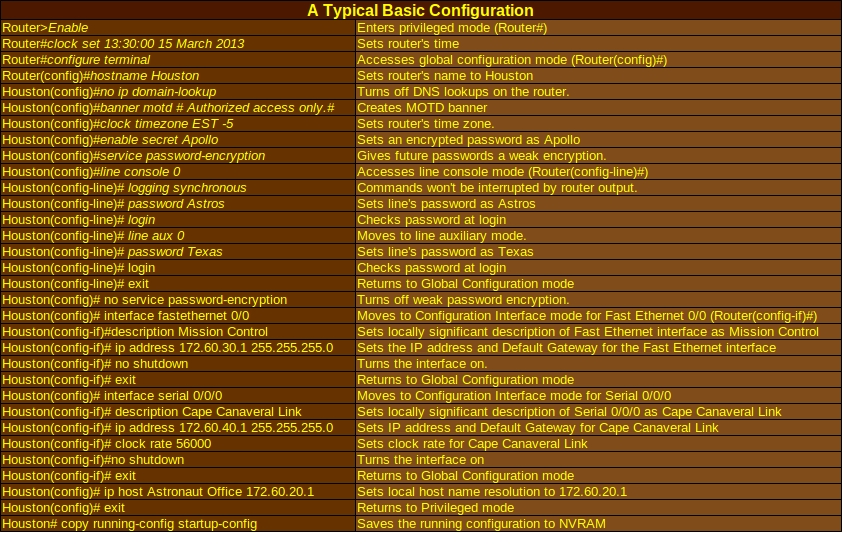
Your router’s configuration is typically set up using the router’s operating system, such as the Cisco IOS. The Cisco IOS uses a graphic user interface that looks a lot like the command line or Terminal on an ordinary workstation. While setting up the router, make sure you are connected to the console port and select the correct COM port. An easy way to tell if you have is to watch the router’s boot-up text.
Once you have access to the Cisco IOS, it will prompt you, Would you like to enter the initial configuration dialog? [yes/no]: Enter yes, and then it gives you another prompt: Would you like to enter the initial configuration dialog? [yes/no]: Entering no will make your life easier. Some routers will simply ask you to hit “Return” to start.
Router Modes
- Router> The user mode with limited privileges, this is the first setting you are in when you access a router’s interface. You can see most basic settings but can’t alter them.
- Router# The privileged mode can be accessed by typing enable at the user mode. To exit from privileged mode, type disable. Privileged mode can be used to restart the system, view the system configuration, enter configuration mode, and use the commands available in user mode.
- Router(config)# The configuration mode can be accessed by typing configure terminal from privileged mode. This mode can be used to modify the running system configuration and access submodes like the Router(config-if)# mode. To exit this mode, type end.
- Router(config-if)# The interface configuration mode controls the interface settings and can be accessed by typing interface in configuration mode.
- Router(config-subif)# The subinterface mode is used to configure multiple virtual interfaces and can be accessed by typing interface in the interface configuration mode.
- Router(config-line)# The line configuration mode controls the settings for the lines connected to the router and can be accessed by typing line, and then the specific identity of the line you want to configure. Line options include console 0, vty 0 4, and aux 0.
- Router(config-router)# The router configuration mode configure an IP routing protocol.
- Lots more… You wouldn’t believe how many modes there are in the Cisco IOS if you’re just getting started with Cisco networking. For a complete list, try the Cisco IOS Command Mode Page. (Don’t worry, I don’t expect you to memorize them. Just be aware they exist if you ever run into a situation where you have to use them.)
Naming Your Router
For the sake of convenience, each router should have a unique name. Go to configuration mode, Router(config)#, and type in hostname routername, replacing routername with the name of your router. If you named your router Accounting, the prompt will now look like Accounting(config)#. You could get a little original in your naming, but for convenience and avoiding trouble with your supervisors, adapting some simple, professional-looking naming system is usually a good idea. (Don’t laugh, please. I’ve really heard of network administrators getting fired because they used profanity or insulted senior-level management in their router names.)
Setting passwords
Remember what I said about mischief on the router level? You can beef up security on the router level by setting passwords. At Router(config)#, you can use enable password yourpassword, replacing yourpassword with a password of your choice. This option isn’t encrypted, though you can apply a weak encryption scheme by typing service password–encryption before you set your passwords. If you prefer not to use that option, no service password-encryption turns it off. A more secure, encrypted option is enable secret yourpassword, which encrypts the password. You can also set passwords for each line, Router(config-line)#. Don’t forget to make your passwords as strong as possible and store your passwords in a secure place for when you need them or hand over your duties to another network administrator.
Viewing Your Interface Names
This is a big one that often gets new administrators because the various models of Cisco routers have different names for interfaces. If you need to know the interfaces you’ll be working with on any particular router, return to Privileged Mode, Router#, and type in show ip interface brief.
Moving Between Interfaces
This can be a little tricky because you can’t move directly from one interface to another. To access an interface, go to Router(config)# and type interface serial 0/0/0 to access a serial interface. While pointed to this interface, the prompt will look like Router(config-if)#. When finished modifying the settings for this interface, type exit to return to Router(config)#. Now type in interface fastethernet 0/0 to access the Fast Ethernet interface. Again, the prompt will look like Router(config-if)#. Because the prompt will look the same for all interfaces, remember the interface you’re connected to while modifying the settings.
Configuring a Serial Interface
Access the Serial Interface by typing interface s0/0/0 in Router(config)#. Set the IP address by typing ip address xxx.xxx.xxx.xxx xxx.xxx.xxx.xxx, replacing the X’s with the IP address and subnet mask. Make sure you have both or the serial interface won’t be configured correctly. A typical setting might look like, ip address 192.168.10.1 255.255.255.0.
Set the clock rate by typing clock rate 56000. This determines the actual speed that data can be transmitted to and from the router and is occasionally confused with bandwidth, the theoretical maximum speed of the connected medium. The clock rate is unique to serial interfaces that have DCE cables connected to them and should be the same on both ends of the cable.
Add a description of the interface with description interface name, replacing interface name with a locally significant name, like Cable to Accounting Department. Finally, type in no shutdown to turn the interface on and make sure it stays on. Shutdown will disable the interface.
Configuring a Fast Ethernet Interface
If you are in Router(config-if)# mode and not already configuring the Fast Ethernet interface, type exit to return to Router(config)#. Type in interface fastethernet 0/0 OR fa0/0 OR fa0/1, depending on what the router calls this interface. You can give it a unique description by typing description yourdescription, replacing yourdescription with a brief descriptive name. Assign an address and subnet mask to the interface by typing ip address xxx.xxx.xxx.xxx xxx.xxx.xxx.xxx, replacing xxx with the numbers for the IP address and subnet mask. Type no shutdown to turn the interface on.
Creating a Message of the Day Banner
Creating banners on your router has actually been useful for prosecuting criminal cases or simply letting other administrators know what might be happening at any given time. At the Router(config)#, type in banner motd # No unauthorized access #. The # signs in this command are called delimiting characters that basically tell the router that the message between them needs to be displayed in the appropriate place. The text between the delimiting characters can pretty much be anything you choose as long as you don’t use one of them in your message. (No worries if you must. The delimiting characters can be another symbol. I’ve used * as a delimiting character.) Some administrators will change banners as events warrant, such as, banner motd # Planned network maintenance will occur between 8 and 10 pm Tuesday. Service may be interrupted. #
Creating a login banner.
Most administrators put their warning banners here so hackers can’t claim they weren’t warned if it comes to a court case. Creating a typical login banner might look like, banner login # Authorized personnel only! Please enter your username and password. #
Setting the Clock Time Zone
This is based on the Universal Time Clock (UTC), also called Greenwich Time or Zulu Time. If you aren’t sure which time zone you are in, it helps to find out because you will need its acronym. This is a good resource if you need a world time zone map. At Router(config)#, the command might look like clock timezone EST -5, with EST being Eastern Standard Time, five hours behind UTC. To set the router’s time, you can also set the time and date using clock set 18:30:00 15 May 2013.
Assigning A Local Host Name to an IP Address
Pinging is often used as a diagnostic tool and can be done from the router, but can be tedious if you have to look up IP address tables every time you need to use it. To make things easier, go to Router(config)# and assign local host names like this: ip host Peoria 172.16.1.3. That way, if you need to ping an office you have in Peoria, you can just go to Router# and type in ping Peoria instead of ping 172.16.1.3. The hostname can also be used for cases where you need to Telnet into a device: telnet Peoria as opposed to telnet 172.16.1.3.
Turning off domain lookups
If a router doesn’t recognize a command, it will try to do a DNS lookup. This can slow things down if you make a typo. To turn off automatic DNS lookups, use the no ip domain-lookup command.
Synchronous Logging
Maybe you really want to get moving on something and don’t want to wait for results of one command before starting on the next. You can turn on synchronous logging by accessing your interfaces and typing in logging synchronous. This will cause your prompt and the command you’re typing to move down one line each time another line of information appears on your screen.
Executive Timeout
What if you walk away from your console for a break and forget to log out? That’s practically an open invitation for the curious to come along and see what they can find out about your router. You can solve that problem by using the exec-timeout command. The default for exec-timeout is exec-timeout 10 0, or ten minutes and zero seconds. You can also set it to exec-timeout 0 0, in which case the console will never automatically log out.
Save Your Configurations!
The changes you make to your router configuration aren’t automatically saved and can be lost if your router loses power or is shut down before you save them. To save, go to Router# and type copy running-config startup-config. This saves your running configuration, which is the configuration on your router right now, to the startup configuration, which will be the router configuration the next time it is booted up. You can also save the configuration to a remote TFTP server by typing copy running-config tftp.
Erasing Configurations
So somebody’s been renaming all your routers to make you look like an ID10T and doing other funny stuff to your configuration. They’ve also saved the changes to your startup configuration. You can very quickly erase all their foolishness by typing in erase startup-config. It will also be helpful to keep regular backups of your router configurations.
Show me this…
- Looking for a specific command? You can see which commands are available in a particular mode by typing show ?.
- show interfaces displays stats for all interfaces connected to the router. You can also inspect a specific interface by typing show interface serial 0/0/0.
- show ip interface brief displays the names, IP addresses, and statuses of all interfaces on the router.
- show controllers serial 0/0/0 shows stats for interface hardware.
- show clock displays the time set on the device.
- show hosts displays the names and IP addresses of the hosts that the router can connect to.
- show users displays the users connected to the device.
- show history displays a history of commands used in a particular mode. Very useful when trying to track down what’s happened on your router recently.
- show flash displays stats about the flash memory.
- Show version displays info about the current version of loaded software.
- Show arp displays information about the local Address Resolution Protocol (ARP) table.
- Show protocols displays the status of configured OSI Layer 3 (Network Layer) protocols, such as IP.
- Show startup-config and show running-config are useful commands if you want to compare the two. Show startup-config displays the saved configuration and show running-config shows the configuration currently in RAM. If you are in Router(config)#, type in do show running-config to see the privileged-level version of this.
Some Useful Books To Check Out
Some Routers To Check Out
[simple-rss feed=”http://rest.ebay.com/epn/v1/find/item.rss?keyword=Cisco+routers&categoryId1=58058&sortOrder=BestMatch&programid=1&campaignid=5337337555&toolid=10039&customid=USB&listingType1=All&lgeo=1&feedType=rss” limit=5]