Network Address Translation (NAT)
Network Address Translation (NAT) provides a way to “swap” IP addresses on an internal network with addresses that external networks see. They do this by modifying packet headers as necessary and keeping track of sessions so that they can “remember” which devices are communicating with devices outside the network. Most modern networks use addresses that are reserved for private networks, so they use NAT to send and receive communications with the outside world. You can set up NAT at the router level by providing information about which interfaces are parts of the internal network and which are outside of the network.
- The NAT Inside Interface is the interface that resides in the boundary of the administrative domain. It can be separate from the default gateway that routes packets to destinations outside the subnet or network.
- The Inside Local Addresses are the IP addresses assigned to hosts on the internal network. These are typically private addresses that can’t be routed outside of the network and have to be replaced by a routable public address before packets can leave the network.
- The Inside Global Address describes the IP address that external networks such as the Internet “sees” once it has replaced the inside local address.
- The Outside Interface sits on the outside boundary of a network or subnet’s administrative domain. It is outside the control of that particular network or subnet.
Configuring and Verifying NAT
The Cisco IOS makes it simple to configure NAT and verify that it is up and running. It only takes a little planning to decide which interfaces are the internal interfaces and which are the external interfaces. To set your internal interfaces, access the interface configuration mode, Router(config-if)#, and use the command ip nat inside for each. To set an interface as an outside interface, the command is ip nat outside.
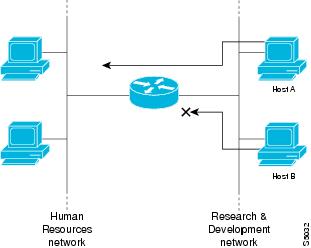
Next, configure the Access Control List (ACL) on your router. With an ACL, you determine what kinds of packets can pass through your router and which hosts can access resources over specific networks. For instance, in this diagram, Host A on the Research and Development side of the router can access the Human Resources network, but Host B can’t. This is useful for setting up permissions that you want the Resource and Development manager to have, but not the rest of the department. This official Cisco page should tell you everything you want to know about configuring ACL on your router.
Cisco recommends configuring ACL on your TFTP server, and then accessing your ACL configuration through your routers. With NAT commands, you can configure a pool of global addresses using the ip nat pool <the pool’s name> <beginning ip address> <ending ip address> [netmask <mask>| prefix-length <length>] You also can configure NAT globally using the ip nat inside source list <ACL> [interface|pool] <name> <overload>.
Using the show ip nat translations command is useful for verifying that NAT is set up correctly.
NAT Configuration

More Options for Configuring NAT
Static NAT: Swaps one internal address for one external address. This is useful for setting up NAT for servers that need to be reached from the Internet, such as web and email servers. Adding an ip nat inside source static <your inside address> <your outside address> command to your configurations is useful for setting up static NAT.
Dynamic NAT: Also referred to as a NAT pool, this type sets up a range of IP addresses that can be used for routing purposes. It is useful in cases where you have a limited number of external addresses, establishes internal address-to-external address sessions each time a connection is established, and frees up the external address according to a timeout value. Setting up a fairly typical dynamic pool uses three commands:
Router(config)# ip nat pool poolname <beginning external ip address> <ending external ip address> netmask 255.255.255.0
Router(config)#ip nat inside source list 1 pool poolname
Router(config)# access-list 1 permit 192.168.1.0 0.0.0.255
Notice anything strange about that last four-octet number? It’s a wildcard mask, which is essentially what you get when you subtract your subnet mask from 255.255.255.255. Covering wildcard masks is worth a whole another blog entry, but for the purposes of NAT, it makes dynamic pools work.
NAT Overload: Also known as Port Address Translation (PAT), this option adds port numbers to the IP address for the sake of uniquely identifying and separating it from other translations using the same address. For each IP address, you can have up to 65,000 port numbers. The savings in terms of IP addresses makes NAT Overload popular for administrators who have to set up NAT for large networks. Setting up NAT Overload is fairly similar to setting up the dynamic version. You use these three commands:
Router(config)# ip nat pool poolname <beginning external ip address> <ending external ip address> netmask 255.255.255.0
Router(config)#ip nat inside source list 1 pool poolname overload
Router(config)# access-list 1 permit 192.168.1.0 0.0.0.255
The difference is on the second command, with the addition of the word overload.
For any form of NAT you use, do not forget to use the ip nat outside and ip nat inside commands, or your router will not know which interfaces are meant to be internal or external. This is the most common error when using NAT. Commands used for troubleshooting include debug ip nat [detailed] and show ip nat translations.
More About NAT

Networking Supplies on eBay
[simple-rss feed=”http://rest.ebay.com/epn/v1/find/item.rss?keyword=%28CCNA%2CCCIE%29&categoryId1=58058&sortOrder=BestMatch&programid=1&campaignid=5337337555&toolid=10039&listingType1=All&lgeo=1&feedType=rss” limit=5]